How To Install Projector?
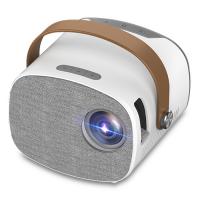
Installing a projector can transform your home or office into a dynamic space for entertainment, presentations, or educational purposes. However, the process can seem daunting if you are unfamiliar with the steps involved. This comprehensive guide will walk you through the essential steps to install a projector, ensuring you achieve the best possible setup for your needs.
Step 1: Choose the Right Projector

Before diving into the installation process, it's crucial to select a projector that meets your specific requirements. Consider the following factors:
1. Resolution: Higher resolution projectors (e.g., 1080p, 4K) provide better image quality.
2. Brightness: Measured in lumens, the brightness level should match the ambient light conditions of your room.
3. Throw Distance: This is the distance between the projector and the screen. Ensure your projector can cover the required distance.
4. Connectivity: Check for HDMI, USB, and other necessary ports to connect your devices.
5. Portability: If you need to move the projector frequently, consider a lightweight and compact model.
Step 2: Select the Ideal Location
The location of your projector is critical for optimal performance. Here are some tips to help you choose the best spot:
1. Screen Placement: Determine where you want to place the screen or the wall you will project onto. Ensure it is free from obstructions and has a flat surface.
2. Throw Distance: Measure the distance from the projector to the screen. Refer to the projector's manual to find the ideal throw distance for your model.
3. Mounting Options: Decide whether you will place the projector on a table, shelf, or mount it on the ceiling. Ceiling mounts are ideal for permanent setups, while tables or shelves offer more flexibility.
Step 3: Set Up the Screen
If you are using a dedicated projector screen, follow these steps to set it up:
1. Mount the Screen: Use the provided hardware to mount the screen on the wall or ceiling. Ensure it is level and secure.
2. Adjust the Screen Size: Most screens are adjustable. Set the screen size according to the projector's throw distance and your viewing preferences.
3. Test the Screen: Lower the screen and check for any wrinkles or distortions. Make adjustments as needed.
Step 4: Install the Projector

Now that you have chosen the location and set up the screen, it's time to install the projector:
1. Position the Projector: Place the projector on a stable surface or mount it on the ceiling. Ensure it is aligned with the center of the screen.
2. Connect the Power: Plug the projector into a power outlet. Use a surge protector to safeguard against power surges.
3. Connect the Source: Connect your video source (e.g., laptop, Blu-ray player, gaming console) to the projector using the appropriate cables (e.g., HDMI, VGA).
4. Turn on the Projector: Power on the projector and the connected source device.
Step 5: Adjust the Image
To achieve the best image quality, you need to make some adjustments:
1. Focus: Use the focus ring or button on the projector to sharpen the image.
2. Zoom: Adjust the zoom to fit the image within the screen boundaries.
3. Keystone Correction: If the image appears trapezoidal, use the keystone correction feature to adjust the angles and make the image rectangular.
4. Lens Shift: Some projectors have a lens shift feature that allows you to move the image vertically or horizontally without moving the projector.
Step 6: Optimize the Settings
Fine-tuning the projector settings can significantly enhance your viewing experience:
1. Brightness and Contrast: Adjust the brightness and contrast settings to match the ambient light conditions.
2. Color Settings: Calibrate the color settings for accurate and vibrant colors. Some projectors have preset modes (e.g., cinema, gaming) that you can use.
3. Aspect Ratio: Set the aspect ratio to match the content you are viewing (e.g., 16:9 for movies, 4:3 for presentations).
4. Audio: If your projector has built-in speakers, adjust the volume. For better sound quality, connect external speakers or a sound system.
Step 7: Test and Enjoy
After completing the installation and adjustments, test the projector by playing different types of content. Check for any issues such as image distortion, color inaccuracies, or audio problems. Make any necessary adjustments to ensure the best possible viewing experience.
Troubleshooting Common Issues
Even with careful installation, you may encounter some common issues. Here are some troubleshooting tips:
1. No Image Displayed: Check the connections between the projector and the source device. Ensure both devices are powered on and set to the correct input.
2. Blurry Image: Adjust the focus and ensure the projector is at the correct distance from the screen.
3. Image Off-Center: Use the lens shift or physically move the projector to align the image with the screen.
4. Overheating: Ensure the projector has adequate ventilation. Clean the air filters regularly to prevent dust buildup.
Maintenance Tips
To keep your projector in optimal condition, follow these maintenance tips:
1. Clean the Lens: Use a soft, lint-free cloth to clean the projector lens regularly. Avoid using harsh chemicals.
2. Replace the Lamp: Projector lamps have a limited lifespan. Monitor the lamp hours and replace it when necessary.
3. Update Firmware: Check for firmware updates from the manufacturer to ensure your projector has the latest features and improvements.
4. Store Properly: If you need to store the projector, keep it in a cool, dry place. Use the original packaging for protection.
Installing a projector can seem like a complex task, but with careful planning and attention to detail, you can achieve a professional-quality setup. By following the steps outlined in this guide, you can enjoy a superior viewing experience for movies, presentations, gaming, and more. Remember to choose the right projector, select the ideal location, set up the screen, install the projector, adjust the image, optimize the settings, and perform regular maintenance. With these steps, you'll be well on your way to creating an impressive and functional projection system.


